Susan Penny

Home Blog Page 5

Out with the new and in with the old!

0


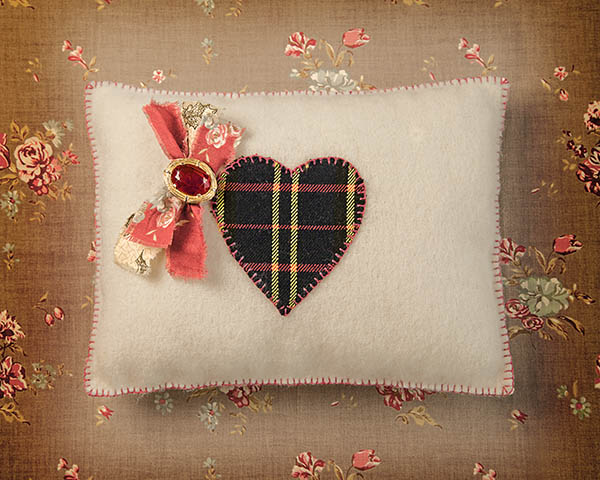
Susan Penny blends some vintage treasures
This project is my way of welcoming in 2014 – a new year, with new challenges and lots of new ideas. I wanted to make something that would remind me of new years past. It had to include tartan, because I have had a bit of a thing about it since spending Hogmanay in Edinburgh several years ago – the kilts were amazing, along with the pipes, Scottish reels and the hospitality. I also wanted to include some vintage blanketing, because over the past year I have grown to love it big time, and find that my workroom is stuffed with this wonderfully versatile material. The pretty red brooch was passed on to me by an elderly friend many years ago. It was already vintage, before vintage was fashionable, but somehow it found its way into ‘the stuff I used to wear but can’t get rid of drawer.’ Happy New Year from me, and I hope that if my elderly friend was still around, she would be pleased that her brooch has a new life in 2014.
Find the FREE project and download here


Pretty Stitched Pincushion

Susan Penny shows you how to make this delightful pincushion in less than an hour. As each new year begins, so does my need to get better organised. This January, I am about to move into my new workroom. It is slightly smaller than the one I am in now, but it is warmer and will I hope, when fitted out, make me so organised that I will be overcome with busy-ness and creativity. In the meantime I must sort and organise the boxes of fabric and equipment that are bursting open in every corner of the old workroom…I dream of colour coordinated fabric trays, and boxes where my equipment comes easily to hand. This afternoon, fed up with folding and stacking fabric, and having a sudden creative urge brought on by the lovely fabric in the picture, I set about making a pincushion for my new desk. I drew around a pudding basin onto the fabric, and again onto another coordinating fabric using a ball-point pen. At this point in the making, do not cut out the circles, but place the fabric pieces right sides together and machine stitch around the circle following the pen line, but leaving a small gap for turning. Once you have joined the circles together, cut just outside the stitched line, leaving a small seam allowance. Turn to the right side, and stuff well, through the small gap in the side seam. Sew up the gap with small neat stitches, and then secure a length of thick embroidery thread to the centre of the pincushion. Stitch over the side and back through the centre, dividing the pincushion into segments. Continue until you have eight segments, then secure the thread at the centre. Sew a button tightly on both sides at the centre point. It took me less than an hour to make this pretty pincushion, which now has pride of place on my new desk.

A truly vintage pig

0

Susan Penny shares a delightful sewing project
As a craft writer I am often asked to pitch for a book idea without knowing if it will ever get published. A blad needs to be produced: this is a small section of the book; a taster to get the book buyers interested in the idea. To fill the blad I need to do several projects, write the instructions, go to the photographic session, work on the page layout, check the proofs, make corrections and then wait while the final draft is presented to book buyers at the Frankfurt Book Fair. My patchwork pig was made by me about 16 years ago, as a project in a new soft toy book. The book finally morphed into another title, so my piggy didn’t make it into print. Now I think he deserves his moment of fame, so I have revamped him in bits of fabric from my scrap bag, giving him a nice new coat and a lovely, fresh contemporary feel. If you want to see how he looked in his original colours then click the link below…
Find the project and download here

Christmas reading: Trisha or Traditional?

0


Find some relaxing holiday reading with Joanne D’Arcy

As well as your own Christmas reading, I think books make a great gift. Easy to wrap, they are a gift that can last a lifetime, and be shared with others as the book gets passed on. And, you don’t have to worry about whether you have bought the right size or colour, as they never go out of fashion!
But what to buy? I have compiled a list of ten I would recommend for Christmas giving and reading. Some I have read, others are on my own reading book list.
Find out Joanne’s favourites here.

Pipe cleaner Xmas trees


Make this fun project with Susan Penny
These miniature Christmas trees cost just a few pence to make using things from your garden shed and your sewing box. The trees are made from soft plant ties bought from a garden centre, wrapped around a central stem – similar to pipe cleaners but with a wire centre, the ties easily bend to shape. For the pot use a large wooden bead or half a wine cork, gluing the stem in place. Glue beads onto the ends of the branches and a bead star to the top. Finish with a ribbon bow. A fun project to make with the kids this weekend.

Editor’s Wednesday Craft Special


Susan Penny shows you how to make a simple tree decoration
This pretty bauble is made by gluing torn pieces of vintage fabric onto a polystyrene ball – I was lucky enough to have some French ticking left over from another project, but any fabric scraps could be used. Add ribbon, net, a button and a bead to the top, holding everything in place with a pin, a dab of glue and a length of bakers twine. A quick and easy decoration for your tree.

Last Minute Advent Calendar

0


Susan Penny shows you how to make this lovely Advent Calendar.

Our children love having an Advent calendar. They count down the days to Christmas, enjoying the special treats found in the calendar. This year, after seeing my project, they decided to leave the old Advent calendar in the trunk, and use these bags on the stair bannister instead. They took very little time for us to make, as the bag outline with cutting and folding lines, and the 24 numbered discs can be printed out onto plain paper. As you can see from the project picture, the Advent calendar was put up this afternoon, and the children are now looking forward to their first  sweet treat tomorrow morning.
Find the project here.

Recycled Christmas Crackers

0


Susan Penny shows you how to turn some scraps into miniature crackers

If your drawers are full of brown paper grocery bags, then this Christmas cracker project is a great way to recycle them into something pretty. With advent just round the corner, these miniature crackers are a great project for the weekend. The crackers are made from a tightly rolled tube of thin cardboard covered in a larger rectangle of brown paper. Add strips of ripped paper from an old book to the ends. Pull in with sparkly thread, then decorate with holly leaves and hearts cut from felt. Use beads for holly berries, then finish with glue and glitter. A great Saturday morning project for you and the kids. Have fun crafting this weekend.

Drumming up a knitted Christmas


Susan Penny shows you how to make these simple knitted Christmas drum decorations.
These delightful knitted drums were inspired by the Christmas rhyme ‘On the twelfth day of Christmas’. Quick to knit in scraps of wool, they are so simple to make, you are sure to find yourself knitting at least twelve to hang on your tree this Christmas.  
Find the FREE project here.